You’ve outlined an excellent, methodical approach to removing black box dye while prioritizing hair integrity. Here’s a step-by-step breakdown with added tips for a seamless process:
Step 1: Hair & Scalp Assessment
• Analyze the Hair: Evaluate porosity, elasticity, and the condition of the hair. Years of black box dye can cause uneven buildup, so expect varying levels of lift.
• Test Strand: Always perform a strand test using the Chromastics XL Powder Lightener and 25 vol developer to predict the lift and determine the number of sessions required.
Step 2: Color Removal Process
1. Initial Color Removal:
• Use Chromastics XL Powder Lightener with 25 vol developer for the first application.
• Apply to the mid-lengths and ends first, as they often have the heaviest buildup.
• Incorporate fine weaving or slicing techniques for even saturation.
• Process for up to one hour, monitoring closely for any signs of overprocessing.
2. Repeat as Needed:
• For subsequent applications, step down to 20 vol or 10 vol to protect the hair.
• Apply in thin, precise sections to target stubborn areas. Soybean proteins in the XL Powder Lightener will help maintain the hair’s structure.
Step 3: Prepping for Highlighting
• Hydration & Elasticity: After lightening, perform a protein or bond-repair treatment to reinforce the hair before heavy highlighting. Products like Olaplex or K18 can be beneficial.
• Sectioning: Divide the hair into clean, manageable sections to ensure precise placement during highlighting.
Step 4: Heavy Highlighting
1. Product Mix:
• Use Chromastics XL Powder Lightener with 25 vol developer for initial highlights.
• Adjust developer strength to 10-20 vol for subsequent rounds to maintain control.
2. Technique:
• Use your ColourWand tools to create consistent balayage or foil placements.
• Aim for soft transitions and avoid over-saturating sections to prevent bleeding.
• Process for up to one hour, depending on the lift needed.
3. Toning Between Sessions: Apply a custom formula after each highlighting session to refine undertones and maintain uniformity.
Step 5: Base Color & Toning
• Base Color Adjustment:
• If the roots need blending, apply a demi-permanent or permanent color close to the natural base.
• Toning:
• Select the toner based on the level of lift achieved. For warm undertones, neutralize with violet or blue-based toners. For overly ashy results, use a warmer toner to balance.
• Mix Chromastics tones with a low developer to seal the cuticle without overprocessing.
Step 6: Aftercare
• Treatment Plan: Recommend a regimen of deep conditioning masks, protein treatments, and sulfate-free shampoos to maintain hair health.
• Reassess in 6-8 Weeks: Black box dye removal is a long-term process. Schedule follow-ups for further lightening or color refinement.
Additional Tips
• Keep the scalp cool by avoiding heat during processing, especially with lighteners.
• Educate the client about the importance of patience and realistic expectations; achieving their desired look may take multiple sessions.
• Document the process with photos and detailed notes for consistency in future appointments.
This meticulous approach ensures both stunning results and the preservation of hair health!
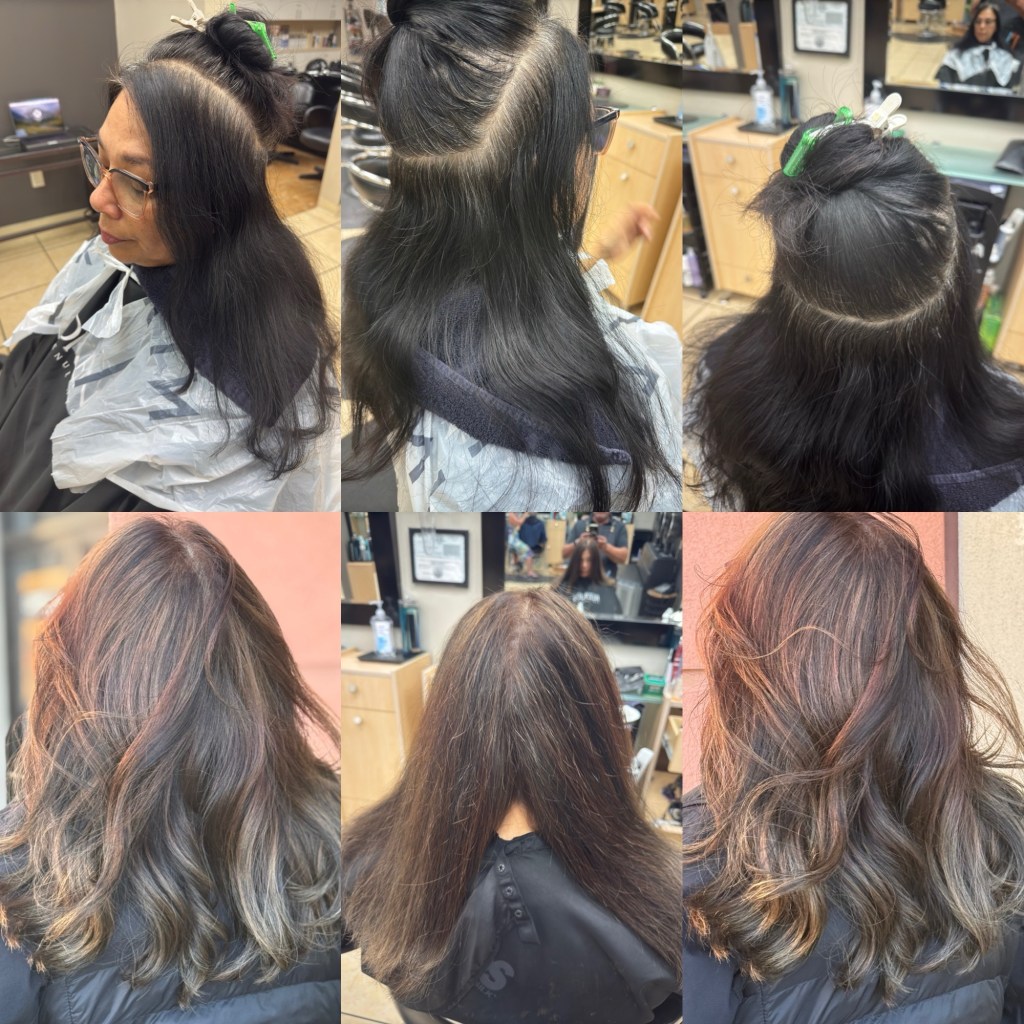
A few sessions are needed for best results hair colorist MartinRodriguez

Leave a comment